As mentioned earlier, my niece Tricia of Z got interested in bees before I did and has given me some advice which I greatly appreciate. The Backwards Beekeepers are great but it is cooler to talk to kin folk. With my travels and travails this month and well into May I have not gotten my bees yet.
Tricia has been moving forward and gathering good experience to help the old uncle later on. Her is her first report:
"They're here! I blogged about them, briefly, but didn't give many details.
We've made mistakes already, and had to fix them. The place we got them recommended just putting the package right in the hive--not dumping the bees. Seemed like a good idea, but a good tenth of the bees would not come out of the package, even after two days, even after we took it out of the hive and put it near the entrance. We finally whacked out the last few of them three days after we got them.
Then we tried feeding them baggie-style, but the baggie leaked. Lesson learned: don't buy cheap baggies with plastic slide closures, and if the hive is at all inclined for water drainage, put the bag opening toward the back.
Of course the leaky baggie meant that ants came. Luckily I noticed before they got into the hive. I put Tanglefoot on to painter's tape and wrapped it around the four legs.
We haven't had to use smoke yet. These bees are very docile at this point--but I know that will change once they start storing their honey. I've been working the hive without gloves!
Now, I'm just dying to get in and make sure we didn't drown the queen, or lose her in all the times we opened the hive. There are bits of wax beneath the hive, which came through the screen, so I know they're building! I'm sure they're fine. We'll try opening it up on Sunday. "
When she says they whacked the bees out of the box, you can be sure she was just hitting the box so they would drop into the hive. She does not kill them for not listening (good thing she has the same philosophy with her kids.)
I notice she has a screen on the bottom of her hive. Hmmm. Can't let those Oakland Hills bees outclass the Bees In The Dale. Someone is going to have to make another trip to LA Honey Co. Darn, I hate having to go there with my check book in my pocket. Just wait until I get back home next week and have a few days before heading out again.
Last weekend was a Vintage Trailer Rally in Ojai, CA. This weekend is an Earthdog Test in Patterson, CA. If you want to learn about Earthdog you have to visit Duffy's Cavern. Next up will be a giant Vintage Trailer Rally in Pismo Beach. It may be the biggest in the country. There will be over 200 trailers there for open viewing on Sat May 16.
If things work out as wished, the Bees Of The Dale will be in place and getting settled in while I am away.
One thing is certain, one day there will be Bees In The Dale.
Thursday, April 30, 2009
Wednesday, April 29, 2009
Making Hives - Part 3
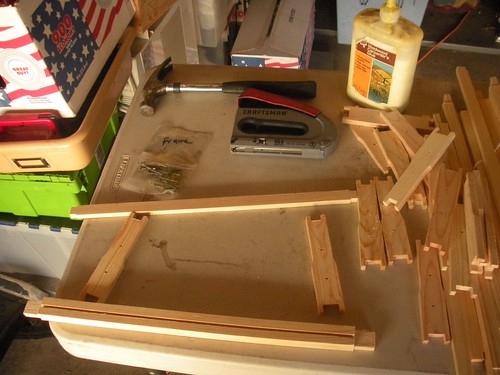
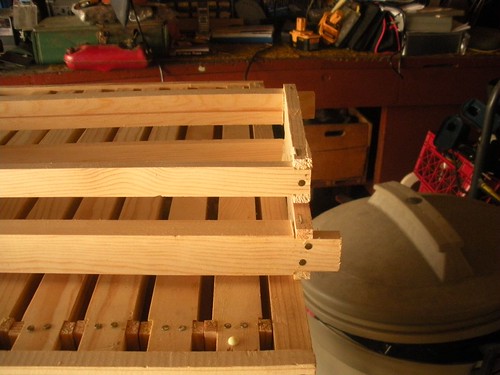
This is what an unassembled frame looks like and the tools you need to put it together. This is a very simple process. LA Honey Co supplies the proper size nails to keep the wood from splitting.
The first step is to glue the pieces together. Any decend wood glue should be fine. Mine is DAP which I have had for a very long time. If you are worried about the strenght, get Gorilla Glue. It has a good reputation and you will feel better.
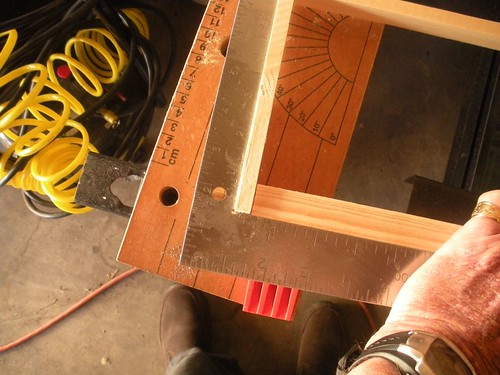
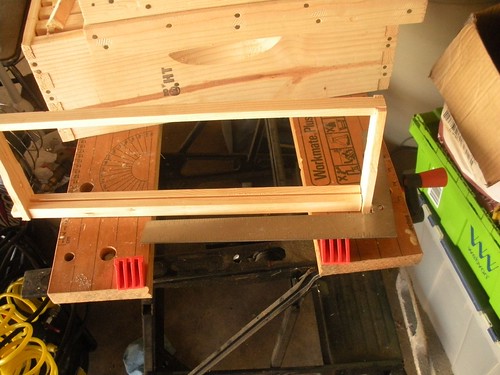
If you have one, use a t-square before stapling or nailng it together. Square frames will be much easier to take in and out of the hive.
At this point I staple all corners with a 1/2' staple. They seem to work but a little longer staple might be better. They will help keep the square shape while the nails are hammered in. Stapling is not requied but I prefer to use them.
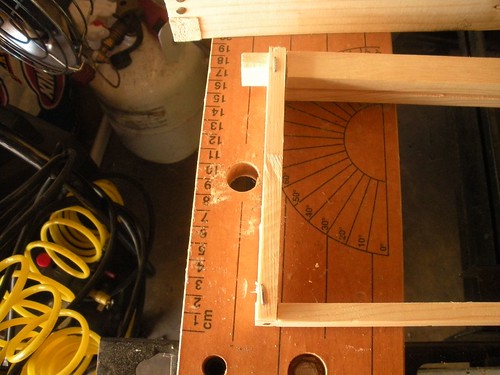
Nailing is straight forward. I have heard to use two nails on the top and one on the bottom and also heard the opposite. It depends on the wood pieces. In the case of LAHCO frames, the upper piece is wider and stronger, it will hold two nails better than the bottom piece.
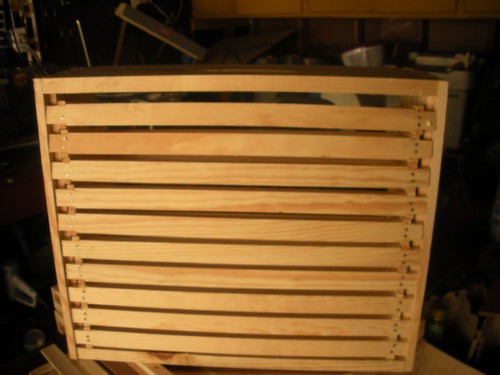
Everything is place. Since I will not use foundations, the next step will be inserting the starter strips and adding wax to the strips. When did my first hive I used a 2" paint bruch and slathered wax all over the place. On the Linda's Bee site she usesa tool that lays a small delicate line of wax on both sides. I have no clue which is best, wide or narrow wax application but her method does use less wax. You still have to buy the wax application device. or use a clean brush.
Still waiting for bees, they are in the pipeline.
My hives are from LA Honey Co and may be slightly different than what you have but the general principles should apply. At this time I do not plan on painting them
I hope this has been helpful
Wednesday, April 22, 2009
Making Hives - Part 2
I glue and nail everything and even add staples to some parts. Your hive will be outdoors in all kind of weather and needs to bear some weight, better it be over built than not.
I have a lifetime of tools and use them but you can do this with just a hammer.
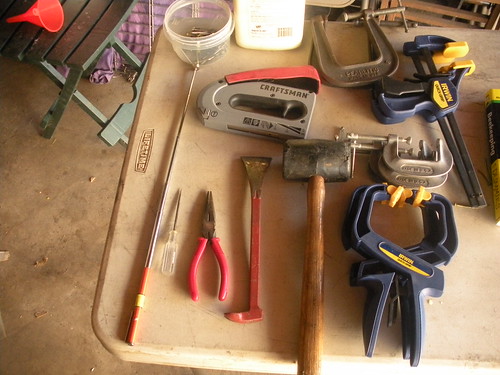
The tools.. little thing on the left is a magnet to pick up all the nails I drop, very handy for Senior knees. The next three are used straighten and remove bent nails (that will happen). Rubber hammer to pound the hive box ends tight before nailing. Lots of clamps, stapler and glue. A bigger hammer will drive nails better.
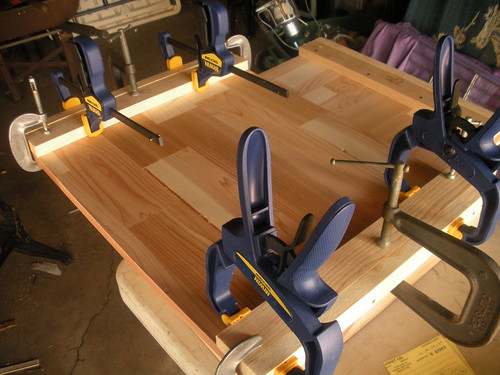
The clamps are used to hold that extra piece on the base of the top and bottom units when they are glued before they are nailed.
Nails....LAHCO supplies a bag for each unit, check them closely some have a couple different sizes..small nails for thin areas and bigger nails for thicker areas.
Top and bottom units look like this with a bracing board on the under side. The bottom unit has an L-shaped piece used for the porch/landing area
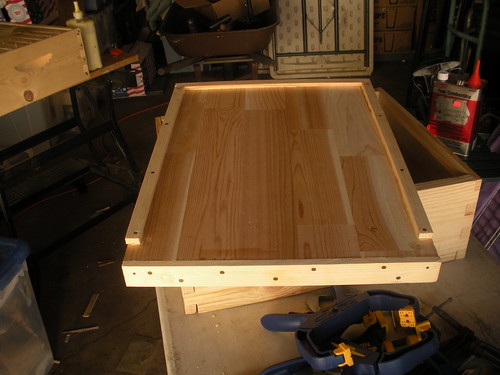
Bottom unit with the short lip on the front and side strips added.

Why a stapler is handy. I used 1/2" staples. Hive wood is not top quality and splits may happen or nails may not drive straight down.
Remove any nails that protrude. You do not want to have the points exposed when you are trying to remove a frame full of bees and honey. Sooner or later one of the nails will get you if you leave them.

This shows where the little wood strips go. Use the rubbber hammer to square the ends before you nail them. Use as many nails as you wish, there does seem to be more than you need. The small nails are around the lip area at the top and the strips if you do not staple
That is about all you need for the hive box , top and bottom.
I am off to a vintage trailer this weekend so the frames will have to wait until I get back.
I have a lifetime of tools and use them but you can do this with just a hammer.
The tools.. little thing on the left is a magnet to pick up all the nails I drop, very handy for Senior knees. The next three are used straighten and remove bent nails (that will happen). Rubber hammer to pound the hive box ends tight before nailing. Lots of clamps, stapler and glue. A bigger hammer will drive nails better.
The clamps are used to hold that extra piece on the base of the top and bottom units when they are glued before they are nailed.
Nails....LAHCO supplies a bag for each unit, check them closely some have a couple different sizes..small nails for thin areas and bigger nails for thicker areas.
Top and bottom units look like this with a bracing board on the under side. The bottom unit has an L-shaped piece used for the porch/landing area
Bottom unit with the short lip on the front and side strips added.
Why a stapler is handy. I used 1/2" staples. Hive wood is not top quality and splits may happen or nails may not drive straight down.
Remove any nails that protrude. You do not want to have the points exposed when you are trying to remove a frame full of bees and honey. Sooner or later one of the nails will get you if you leave them.
This shows where the little wood strips go. Use the rubbber hammer to square the ends before you nail them. Use as many nails as you wish, there does seem to be more than you need. The small nails are around the lip area at the top and the strips if you do not staple
That is about all you need for the hive box , top and bottom.
I am off to a vintage trailer this weekend so the frames will have to wait until I get back.
Monday, April 20, 2009
Making Hives - Part 1
I checked the Backwards Beekeeper blog and got the name of a local beekeeper supply, L.A. Honey Co, 1559 Fishburn Ave, LA 90063, (323) 264-2383, located just east of downtown off the I-10. (Use a GPS or a good map for your first visit. It is easy to find after the first trip which can be strange.)
Hive boxes, supers, come in several sizes. Tricia had recommended I stick to the medium super for all parts so I did not end up with different size frames. A full standard hive with 10 frames weighs about 80 pounds when full of honey. A medium with 10 frames weighs about 60# and with 8 frames about 48#. Being a certified Senior Citizen, the medium super sounded like the size for me. LA Honey sells medium supers with 10 frames which I can handle.
They are happy to sell you the fully finished super complete with foundation wax and all you have to do is set it out and add bees. They will answer any of your questions and quickly recognize the "Kirk converts" and help you out.
Another option is to buy the parts and put them together yourself. This is a great money saver but there are no instructions. You get nails specific to each unit and all the parts but no instructions so look a the finished supers off to the side and make mental notes.
I finally got it right after a couple of trips to the store. This is how it is done by me....
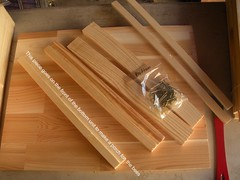
 This is what you come home with when you get one super, top and bottom (BK For Dummies was in the back of the truck.)
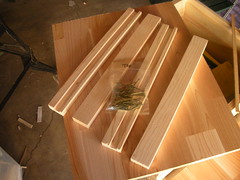
On the top is the top unit. Placing the end pieces is obvious, I will show where to put those other two straight pieces later. The second shot of of the bottom unit. Note the piece with only one lip, that will go on the front and form the bee porch. The two thin pieces will be where the super rests on the bottom. That will be very clear when it is done.

Hive boxes, supers, come in several sizes. Tricia had recommended I stick to the medium super for all parts so I did not end up with different size frames. A full standard hive with 10 frames weighs about 80 pounds when full of honey. A medium with 10 frames weighs about 60# and with 8 frames about 48#. Being a certified Senior Citizen, the medium super sounded like the size for me. LA Honey sells medium supers with 10 frames which I can handle.
They are happy to sell you the fully finished super complete with foundation wax and all you have to do is set it out and add bees. They will answer any of your questions and quickly recognize the "Kirk converts" and help you out.
Another option is to buy the parts and put them together yourself. This is a great money saver but there are no instructions. You get nails specific to each unit and all the parts but no instructions so look a the finished supers off to the side and make mental notes.
I finally got it right after a couple of trips to the store. This is how it is done by me....
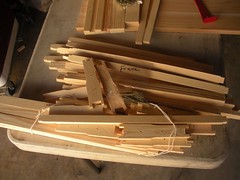
Here you have a pile of 10 frames after the string is removed. Next are the parts for single frame.
LA Honey is very good about supplying all the proper nail sizes you need for different pieces. You will probably end up with some extras, save them. You will end up with some crooked nails that need replacing.
In Part 2 I will put the pieces together but it is 100 deg outside and I am staying in here until later.
Most of the construction is common sense so feel free to ignore anything I have said, especially since I am still waiting for bees.
Getting started
I was driving somewhere and happened to have the radio tuned to KPCC-FM when Kirk Andcrson of Backwards Beekeepers was being interviewed. (Backwards because he recommends going backwards away from modern methods using chemicals and artificially bred queens. He traps feral bees and shares them.)
I have enough room for a garden, mainly heirloom tomatoes, raise worms for their by-products and do some composting. I am not a green maniac but I tend to lean that why when I have the choice.
Bees??? Sounded like a natural fit. I had this idea that someone would show up , install a hive, care for it and give me honey. Oh,sure. That can happen but not this time.
As fate would have it my niece, Tricia, in Oakland, CA, was just starting on her bee adventures and had actually done some homework. She gave me some good advice. Check the web and get a reference book. Beekeeping for Dummies is a good book for beginners, it is readily available and is written so the novice can understand things. There are other good books out there but Istarted with Dummies and have recommended it to others.
I read most of it and decided to go forward.
Sunday, April 19, 2009
Summer Day in April
 This year the weather here has been sort of random, cool, warm, wet, hot, windy etc. You name it and it has shown up all Spring and no pattern has been set yet.
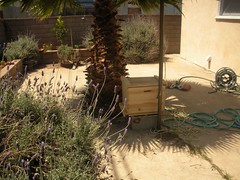
I guess it is a good thing at this point that the bees have not arrived. It gives me a chance to more the hive around and select the best spot. Originally I had it placed against the far wall in the upper right corner next to a lavender bush.
On this past Wednesday my niece and fellow beekeeper (check the Wonder Farm link) and family were here and freezing in the wind. Today it is 91 deg. Go figure but once I went out to look at the hive site it was very obvious that the wall place was not the best. I have moved it under the volunteer palm tree in the middle of the concrete pad. It will have shade during mid-day, some filtered sun for the East in the morning and the palm trunk will offer some protection in the late afternoon.
I think I read somewhere that it is best to face them to the South so that is were it is now. Most of the time we have a West wind blowing in from the beach three miles away.
If bees prefer a different orientation, let me know.
Life With Bees
Hi, welcome to The Buzz In The Dale.
I have just finished "waxing" my frames. To give the bees a place they like to start, a strip of wood is attached to the top of the frame. As it happens the slot is perfect to use a paint stir stick, about 1.5 sticks each frame. Home Depot frames fit very nicely but have all that orange paint (not to complain to much, they are free.). Lowe's paint sticks are sort of useless, too thin, too fragile but they will work if you have no other option. Wrap a couple folds of newspaper around the edge and they can be made to fit. The beeswax seems to hold them in securely.
After looking at a number of web pages on hive construction, I found something that should work better and look better too. (I assume bees appreciate quality workmanship).
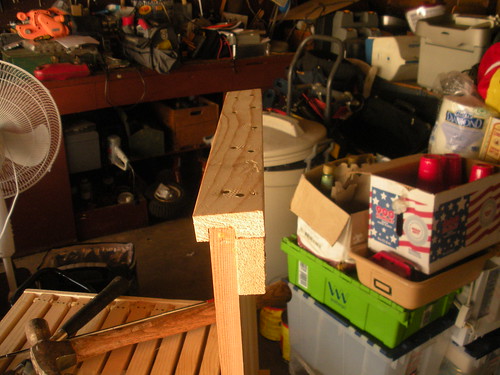
Check the moldings in the lumber section of the store. Look for an "L" shaped piice, mine was called corner molding. Cut it to size, apply glue and clamp until secure.

 This costs more but I have used up my supply of paint sticks at the local store and I do not want to be nabbed for grabbing 5-6 sticks every time I am at Home Depot. If you don't mind that, go ahead.
I am very new, very very very new to beekeeping and I do not have any bees yet. They are coming and should be in place in the next week or so. In fact you can see where I think they are coming from at the BACKWARD BEEKEEPERS BLOG,
Look at the section entitled "Trapout Illustrated."
Take nothing I say here as gospel, I have just read or heard it. I have no real experience to back up it. This is the journey of a novice
Look at the section entitled "Trapout Illustrated."
Take nothing I say here as gospel, I have just read or heard it. I have no real experience to back up it. This is the journey of a novice
I have just finished "waxing" my frames. To give the bees a place they like to start, a strip of wood is attached to the top of the frame. As it happens the slot is perfect to use a paint stir stick, about 1.5 sticks each frame. Home Depot frames fit very nicely but have all that orange paint (not to complain to much, they are free.). Lowe's paint sticks are sort of useless, too thin, too fragile but they will work if you have no other option. Wrap a couple folds of newspaper around the edge and they can be made to fit. The beeswax seems to hold them in securely.
After looking at a number of web pages on hive construction, I found something that should work better and look better too. (I assume bees appreciate quality workmanship).
Check the moldings in the lumber section of the store. Look for an "L" shaped piice, mine was called corner molding. Cut it to size, apply glue and clamp until secure.
This costs more but I have used up my supply of paint sticks at the local store and I do not want to be nabbed for grabbing 5-6 sticks every time I am at Home Depot. If you don't mind that, go ahead.
Subscribe to:
Posts (Atom)